Best Free DVD Ripper Software Review: Top Picks for Ripping DVDs
Summary: Looking to rip your DVDs? This article covers the top DVD ripper software, both free and paid, to help you easily convert DVDs to digital formats. We review options like DVDFab DVD Ripper, WinX, and HandBrake, discussing key features, pros, cons, and a step-by-step guide for each tool to suit various needs.
Table of Contents
Looking to digitize, back up, or archive your DVDs? DVD rippers have advanced significantly, providing simple methods for extracting high-quality DVD content. In this post, we'll look at both free and commercial DVD ripping software, outlining their features, pros, and cons so you can select the best solution for your needs.

Considerations When Choosing the Best DVD Ripper
Selecting the best DVD ripper can be challenging with so many options available. Take into account these important features to help you choose the one that best suits your demands.
- Compatibility: Verify that your operating system and the ripper are compatible.
- User-Friendliness: Choose a user-friendly option, particularly if you're new to DVD ripping.
- Editing Features: Look for features that allow cropping, trimming, adjusting resolution, and selecting subtitles/audio tracks.
- DVD Encryption: Check if the ripper can bypass encryption; free versions may have limitations.
- Output Formats: The ripper needs to support a wide range of formats, especially the formats that you need.
3 Best DVD Ripping Software for Windows & Mac
1. DVDFab DVD Ripper
DVDFab DVD Ripper is a comprehensive solution for high-quality DVD conversion to a variety of digital formats. It ensures seamless ripping by getting over copy protections like CSS and APS. Thanks to GPU acceleration, it can convert DVDs up to 50 times faster. The software also offers easy-to-use settings for beginners and more advanced options for experts, making it simple to convert DVDs for smartphones, home theaters, or other devices.
Key Features:
- Wide Compatibility: Compatible with Windows 7–11 and macOS 10.10–14.x.
- Removal of Advanced Protection: Removes protections such as RC, RCE, APS, and 99-title.
- Broad Format Compatibility: DVDs can be converted to more than 1000 formats, such as MP4, MKV, 3D, 4K, H.265, and others.
- Customizable Ripping Options: Allow users to choose which audio tracks, subtitles, chapters, and titles to extract.
- Faster Batch Conversion: Uses multi-core CPUs and Intel Quick Sync for faster processing.
- Metadata Synchronization: Automatic synchronisation of metadata makes media administration simpler.
- Built-in Video Editor: Provides tools for cropping, trimming, watermarking, brightness adjustments, and more.
How to Rip a Copy-protected DVD via DVDFab DVD Ripper
Step 1: Download and Install DVDFab 13
Install DVDFab DVD Ripper on your Windows or Mac computer after downloading it. To get started, launch the software after installation.
Step 2: Insert DVD Disc, ISO or folder

Put the DVD on your disc drive. DVDFab will automatically detect and decrypt the disc.
Step 3: Choose the Format and Profile You Want
Select a pre-configured profile, like "MP4.Mobile" for compatibility with mobile devices or "MP4.Passthrough" for lossless home theater experience. By selecting particular audio tracks or adding subtitles, you can further alter the output.

Step 4: Tailor the Audio and Video
Select "Advanced Settings" to modify settings such as frame rate, codec, and resolution. If necessary, crop, edit, or improve your video using the "Video Edit" tool.

Step 5: Define Output Location and Start Ripping
Click the "Folder" icon at the bottom to choose where you want to save the output file, then click "Start" to begin the ripping process.

2. WinX DVD Ripper

WinX DVD Ripper is a dependable program for converting DVDs into digital formats. It supports both DVDs and saved folders and has features like subtitle ripping and audio track selection. The free version restricts ripping to 5 minutes, whereas the paid version removes restrictions, enhances speed, and removes watermarks.
Key features:
- Adaptable Input Options: You can rip directly from DVDs or computer folders.
- Wide Format Support: Converts DVDs to over 320 different formats that work with a wide range of devices.
- Subtitle Customisation: Users can rip original subtitles or embed their into video files.
- Audio Track Selection: Choose which audio tracks to include in your ripped video.
- Free and Paid Versions: The free version lets you rip for up to 5 minutes. The premium edition provides limitless ripping, higher speeds, and watermark-free output.
- Speed Optimization: The paid version enhances conversion speed.
How to use WinX DVD Ripper to rip DVD:
Step 1: Open and Load Your DVD
Download and install WinX Free DVD Ripper on your Windows PC (versions 11/10/8/7). Depending on your requirements, load a physical DVD, ISO image file, or DVD folder into the software.
Step 2: Select Output Format or Device Profile
Choose your preferred format from the Output Profile window, such as MP4 H.264, MOV, AVI, or a device profile for iPhone, iPad, and other devices.

Step 3: Edit Video

Click the "Edit" button to edit a title with the built-in editor, you can adjust volume, add or position subtitles, crop, expand, or trim the video.
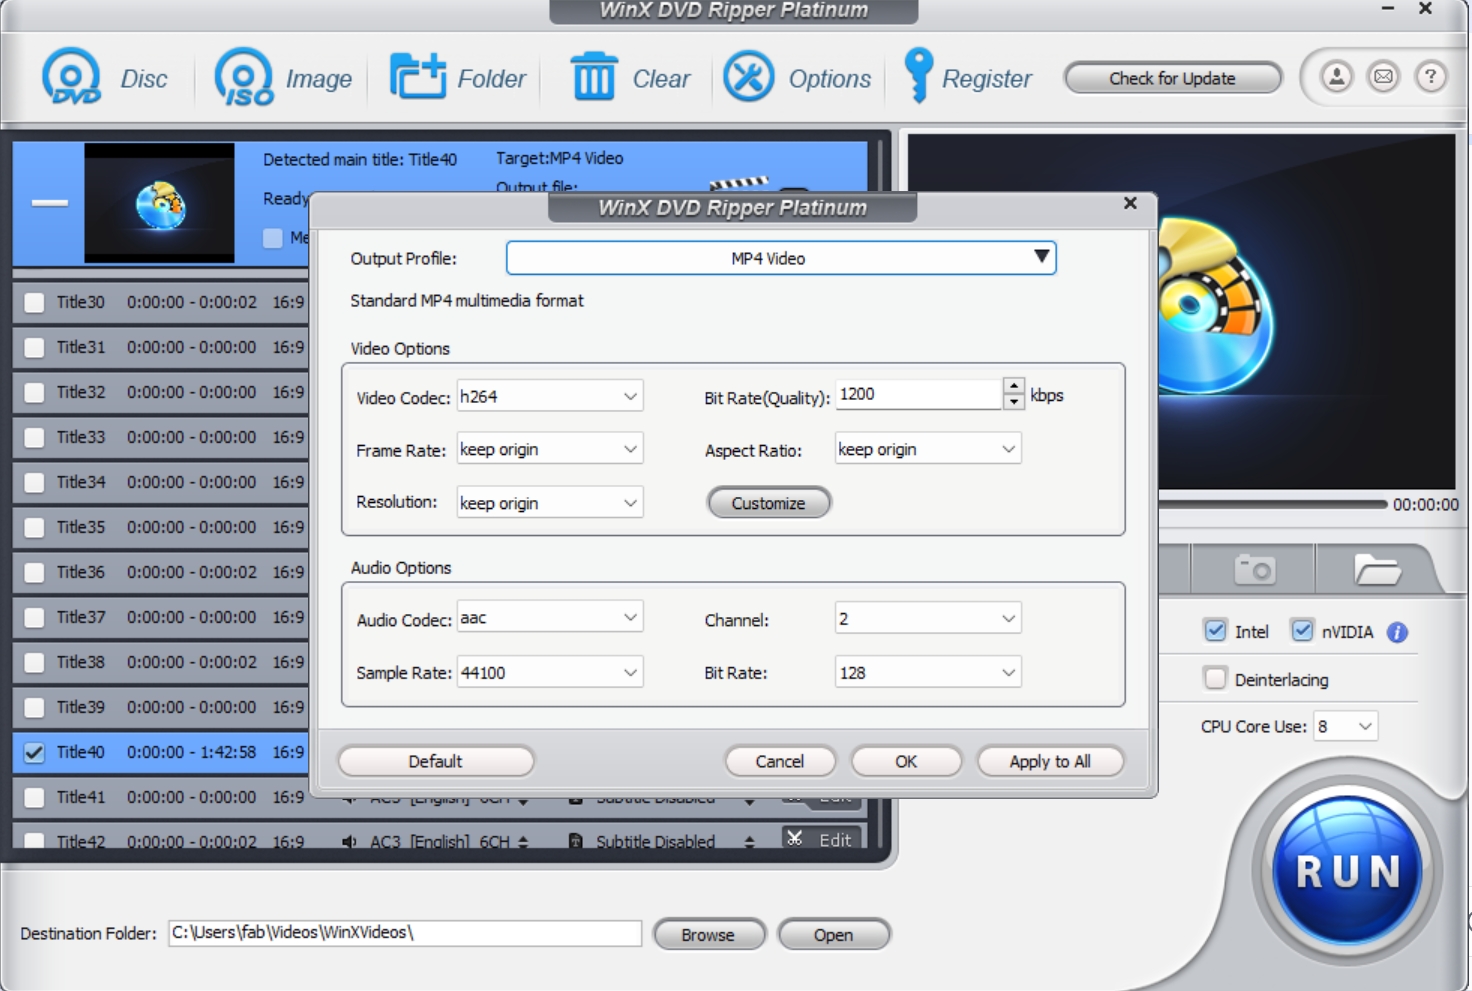
Step 4: Customize Output Settings
- Click the gear icon to adjust video/audio settings such as codec, bitrate, resolution, and more for balancing quality and file size.
- Click the clapperboard play icon to change the output profile directly to suit your desired format.
- Click the "SET TAG" button to rename the output file for compatibility with devices like iPhone, iPad, and Apple TV.
- Enable "Merge titles" to combine selected titles into one video.
Step 5: Click "Browse" to set the output path. Then click "RUN" to start ripping DVD to MP4.
3. Movavi Video Converter

Movavi Video Converter is an easy-to-use media tool that streamlines your file conversion tasks. Beyond converting video formats, it also lets you compress media files, extract audio tracks, and rip DVDs into popular formats like MP4, MKV, and AVI. Whether you're digitizing your DVD collection or editing videos with features like noise removal and cropping, Movavi provides an all-in-one solution for both Windows and macOS users.
Key Features:
- Comprehensive Format Support: Convert between 180+ formats, including MP4, MKV, AVI, MPEG, and more.
- Audio Extraction: Extract and save audio tracks from video files for standalone playback.
- Built-In Editing Tools: Use noise removal, rotation and cropping for file customization.
- User-Friendly Interface: Simplifies conversion and editing for all users.
How to use Movavi Video Converter to rip DVDs:
Step 1: Open Movavi Video Converter
Launch the program and click on the "Add Media" button. Select "Add DVD" > "Open DVD" and navigate to the VIDEO_TS folder on your DVD.

Step 2: Choose Your Output Format
Select your desired video format or device preset from the "Video" or "Devices" tab. Choose from over 180 formats and 200 device presets.

Step 3: Set the Destination Folder
Click "Save to" to select the folder where you want the ripped file to be saved.
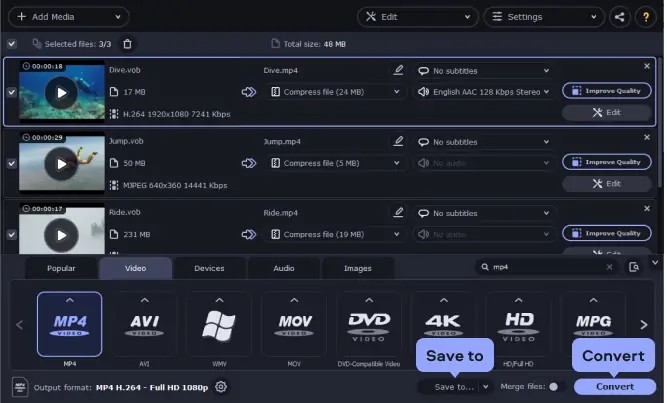
Step 4: Start Ripping the DVD
Click "Convert" button to begin the DVD ripping process.
Top 5 Free DVD Rippers for Windows, Mac & Linux
1. HandBrake

HandBrake is a powerful, free, open-source tool for converting and ripping DVDs. It also supports Blu-ray ripping and various file format conversions. While it offers extensive features, its interface is less user-friendly than simpler programs. However, it allows you to choose specific chapters to rip, crop unwanted parts, and customize settings. It's available on Windows, macOS, and Linux.
Key features:
- Video Conversion: Converts videos to MP4, MKV, or WebM formats.
- Editing Tools: Includes resizing and cropping options.
- Audio Processing: Offers pass-through audio, downmixing, and volume adjustments.
- Artifact Removal: Eliminates telecine and interlacing artifacts.
- Additional Tools: Title/chapter selection, subtitles, batch processing, video filters, live preview.
- License: GNU GPL v2; some parts under BSD 3-Clause.
How to convert DVD to MP4/MKV with HandBrake:
Step 1: Download and Install HandBrake
Visit the official website and click the "Download HandBrake" button. Follow the installation process for your operating system:
- Windows: Open the installation file and follow the setup wizard.
- macOS: Open the DMG file, verify if prompted, then drag the HandBrake icon into the Applications folder.
Find HandBrake in the Start menu (Windows) or Applications folder (Mac). The app icon is a pineapple next to a cocktail glass.
Step 2: Load Your DVD

Insert the DVD into your computer’s drive. In HandBrake, select the DVD from the "Source Selection" menu on the left.
Step 3: Set Rip Settings

Choose the part of the DVD to rip by selecting a title and chapter range from the dropdown menu next to "Title". This is useful if you don’t want to rip the whole DVD.
Step 4: Set Output Location
Click the "Browse" button next to "Save As:" to choose where the ripped DVD will be saved on your computer.
Step 5: Select a Preset and Start Encoding

Choose a preset. Options are device specific like Apple TV or general like "Fast" or "Very Fast". Once ready, click “Start Encode” at the top of the window. A progress bar will show the rip’s progress.
2. Freemake Video Converter

Freemake Video Converter is a versatile freeware solution that goes beyond basic DVD ripping. Similar to HandBrake, it enables seamless conversion between various video file formats, making it easy to tailor videos to your preferred format. Additionally, this tool offers the capability to burn videos back onto DVDs, allowing you to create personalized DVD collections. Note that Freemake Video Converter is exclusively available for Windows users.
Key features:
- 4K and HD Video Conversion: Convert 4K, Full HD 1080p, and HD 720p videos from cameras, camcorders, or Blu-ray without losing quality.
- Video Editing Tools: Cut unwanted parts, rotate clips 90 or 180 degrees, join multiple videos, and remove black bars.
- Web Embedding: Encode videos to formats like FLV, SWF, MP4, WebM, or OGG, with ready web players and embed codes for sites or blogs.
- Subtitle Integration: Add and edit subtitles in SRT, ASS, or SSA formats. Adjust size, font, and special characters.
- YouTube Upload: Upload videos, photos, DVDs, or music directly to YouTube, transform MP4 to MP3, and upload multiple files at once.
- User-Friendly: Designed for simplicity, even complex tasks can be completed in just three clicks.
- Wide Compatibility: Fully supports Windows 10, 8, 7, and Vista, trusted by millions globally.
Steps to rip a DVD using Freemake Video Converter:
Step 1: Add Your DVD to this program

Place the DVD into your drive to begin ripping it into a digital format. Click the "+DVD" button, then select your DVD drive and click OK.
Step 2: Choose a title
The software will scan the disc and display a list of titles, which will include the main movie and any extra content. Pay attention to the lengths of each title to identify the film. Typically, the movie will be listed first.
Step 3: Choose an output digital format

At the bottom, there is a scrollable selection of output formats. For playback on a console or mobile device, select your device's manufacturer and model. For optimal compatibility on a PC, choose the MP4 format.
Step 4: Rip the DVD
Select the destination folder on your computer or external drive to save the ripped files. Hit “Convert” to begin ripping the DVD into a digital format for easy access and playback.
3. MakeMKV

MakeMKV provides an easy-to-use solution for DVD ripping, perfect for users who prefer simplicity. It allows you to select specific chapters for extraction but only supports the MKV format. While the tool’s straightforward design limits advanced customization, it's an excellent choice for beginners. Currently in its beta stage, MakeMKV is free and available on Windows, Mac, and Linux.
Key features:
- Preserves all video and audio tracks: Keeps the original quality, including HD audio.
- Keeps chapter information: Retains all chapter markers for easy navigation.
- Retains all meta-information: Preserves audio type, language, and other metadata.
Step-by-step guide to rip DVDs with MakeMKV:
Step 1: Download MakeMKV software

Visit the official MakeMKV page and download the version for your OS (Windows or Mac).
Step 2: Launch MakeMKV and insert the disc or DVD into the optical drive. The software will scan it.
Step 3: Choose the titles you want to rip. You can select audio tracks and subtitles as well.
Step 4: Click "Make MKV" to begin ripping.

4. VLC Media Player

VLC Media Player is not just a media player but also a free DVD ripper. With its built-in converter, you can rip content from DVDs in no time. The program supports multiple video and audio codecs for quick and flexible conversions. However, for protected DVDs, you’ll need to install additional library profiles for full functionality.
Key features:
- Multimedia Playback : Supports discs, files, devices, cameras, and streaming.
- Ad-Free: No spyware, advertisements, or user monitoring.
- Hardware Decoding: Supports hardware decoding on most platforms, including 0-copy on the GPU and software fallback when necessary.
-
Wide Format Compatibility: Supports a variety of video and audio formats, including:
- Video formats include MPEG-1/2, DivX, MPEG-4 ASP, H.264, XviD, WMV, Theora, and more.
- Audio formats include MP3, FLAC, AAC, Vorbis, WMA, DTS, and more.
- Subtitles include SubRIP, SSA, MicroDVD, VobSub, and more. - Advanced Controls : Provides subtitle synchronization, video/audio filters, and comprehensive customization options.
- Input Media Compatibility: UDP/RTP (Unicast and Multicast), HTTP/FTP, MMS, DVD Video, VCD, SVCD, DVB, and others.
How to use VLC Media Player as a free DVD ripper:
Step 1: Download and install VLC Media Player from the official website. Select the correct installation file for your OS (Windows, Mac, or Linux) and follow the setup instructions.

Step 2: Put your DVD in the computer, open VLC and click “Media > Convert / Save…”. You can also load ISO files or VIDEO_TS folders.

Step 3: Go to the “Disc” tab, select the DVD source and check “No disc menus”. Select the title and chapter you want to rip. And select audio and subtitle tracks, then click “Convert / Save”.

Step 4: In the "Convert" window, select MP4 (H.264 video and MP3 audio) from the Profile dropdown.

Step 5: To rip the DVD, click "Browse" to select the destination folder, name the file, then click "Start".
5. Disk Utility

Disk Utility is a built-in tool on all Macs as well as a free DVD Ripper for Mac. It’s designed to manage internal and external storage devices and you can rip DVDs with it by just connecting a DVD drive to your Mac. By using your Mac’s hardware, Disk Utility is a simple way to convert DVDs to digital formats without needing any extra software.
Key features:
- Volume Management: Format and manage volumes on storage devices.
- ISO Image Creation: Enables users to make ISO images of DVDs, which can be used for later use or burning to other discs.
- Minimal DVD Ripping Tools: Primarily used for disk management rather than advanced ripping, making it more suitable for basic copying tasks.
- Integration with macOS: Seamlessly integrates into the macOS ecosystem, so users familiar with Apple's built-in utilities will feel right at home.
A guide to using Disk Utility for ripping a DVD:
Step 1: Open Disk Utility

Launch Disk Utility on your Mac. Select the DVD file you want to rip from the left panel, then click the “File” menu. Choose “New Image” and click “Image from [your DVD name]”.
Step 2: Configure and Save

Fill out the "Save As" field in the dialog box with a new name for your file. Select your preferred format from the "Format" field, then click "Save" to confirm your selections.
Step 3: Start Ripping

Disk Utility will begin ripping the DVD automatically. Wait for the process to complete, after which your ripped DVD file will be ready on your Mac.
Comparison of the Top 8 DVD Rippers: Paid vs. Free Options
| Features/Product | DVDFab DVD Ripper | WinX DVD Ripper | Movavi Video Converter | HandBrake | Freemake Video Converter | MakeMKV | VLC Media Player | Disk Utility |
| Input format | DVD/ISO/Folder | DVD/ISO/Folder | DVD/Folder | DVD/ISO/Folder | DVD/ISO/Folder | DVD/ISO/Folder | DVD/ISO/Folder | DVD/ISO |
| Output format | 1000+ | 320+ | 180+ | MP4, MKV and WebM | 500+ | MKV | Limited | Limited |
| Ripping Quality | Lossless | High | High | High | Good | High | Good | Good |
| GPU Acceleration | Yes | Yes | Yes | Yes | Yes | No | Yes | No |
| Ripping Speed | Very Fast, 50x | Fast | Fast | Decent | Decent | Decent | Decent | Decent |
| Preset device | 260+ | 350+ | 200+ | Limited | 50+ | Limited | Limited | NA |
| Video Editing | Yes | Yes | Yes | Yes | Yes | No | Yes | No |
| Support New Encrypted Discs | Yes | Yes | No | No | Yes | Yes, but limited | No | No |
FAQs
1. Is using a DVD ripper legal?
Ripping a DVD for personal use, like making a backup, is typically legal. However, bypassing copy protection could be a violation of copyright laws in some areas.
2. Does DVD ripping software damage the DVD?
No, DVD ripping software doesn’t harm the disc itself. It simply reads the data from it, without any physical impact.
3. How long does it take to rip a DVD with a DVD ripper?
Your computer's performance, the size of the DVD, and your software all affect how long it takes. Expect it to take 20 to 40 minutes on average.
Conclusion
Selecting the best DVD ripper doesn't have to be challenging. Each ripper offers unique functionality to suit your specific needs, whether you want a free program like HandBrake or a commercial one like DVDFab DVD Ripper. Simply spend some time determining what matters most to you, then use the comparison table above to identify the best tool for your DVD ripping needs.
 How to Burn YouTube Video to DVD: Best Methods & Steps
Try the best tools to burn YouTube videos to DVD with pros, cons, and step-by-step assistance. Get a highlight on YouTube video downloading methods.
 How to Convert DVD to MP4 on Windows and Mac: Top 7 Tools
Pile of dust on your hefty movie collection may compel you to seek reliable ways to convert DVD to MP4. Learn about the 7 best free tools to convert DVD to MP4.
- Two Ways to Burn M4V to DVD Without Encryption & With Customization
Get to know the useful methods to burn M4V to DVD directly and enjoy the burned M4V file without encryption on a huge screen.
 How to Easily Extract Audio from DVDs: A Quick Step-by-Step Guide
Learn how to extract audio from DVDs effortlessly with tools like DVDFab, VLC, and more. Follow our step-by-step guide for quick and efficient audio ripping.